
With fresh microgreens on hand, you can add tons of nutrients to your salads, stir-fry dishes and so much more. These greens are tough to find in normal groceries stores and go for quite a premium at specialty shops. Fortunately, they are incredibly easy to grow indoors and taste best when cut fresh. If you’re ready to get started, just use this guide on how to grow microgreens to learn what to do.
Microgreens are fresh veggie sprouts that are allowed to grow for around two to three weeks before harvesting.
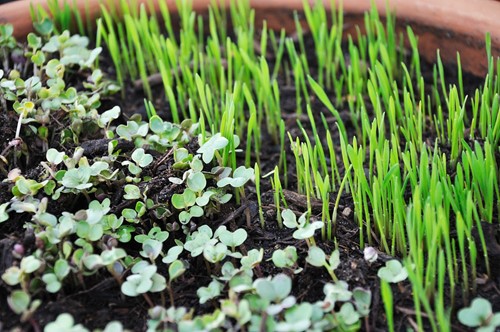
Plants that work great for this purpose include:
Arugula
Mustard
Kale
Broccoli
Swiss chard
Cabbage
Radishes
Basil, cilantro and other herbs can work well, too, as long as you give them about a full month of growing time before harvest.
You can try out any vegetables you want to know if you like their microgreens. The only exception are nightshade plants, like tomatoes, since their stems are toxic when consumed.
If you have a garden window or wide windowsill, you can grow your microgreens in the sunlight nearly year-round. They will need about six hours of direct sunlight to sprout and quickly grow to their harvestable size.
Otherwise, you can use full-spectrum LED grow lights to keep your microgreens growing strong. Just be sure to position the lights about 12- to 24-inches above the soil to keep your greens from getting too leggy and falling over.
As you first learn how to grow microgreens indoors, you’ll want to use soil as your growing medium of choice. Go with a high-quality seed starting medium with organic fertilizer and scoop it into a planting tray, egg carton or similar container.
Then, you can sow your seeds by casting them out over the entire surface of the soil without worrying about crowding. You won’t grow them into full-size plants, so you don’t have to give them extra room in the tray. Cover the seeds with about a ¼ inch of additional soil.
If your seeds refuse to sprout within the first week, consider adding a heat mat under the container. Many seeds will not sprout if it’s not consistently around 70 degrees, so the extra warmth can help encourage them to germinate and start growing.
As the seeds germinate and sprout, you’ll want to keep the growing medium damp but not soaked. The easiest way to do that is by watering it with a spray bottle every couple of days. If it’s hot out, you may need to water once or twice a day instead. Just monitor the soil and water when it seems dry.
Most microgreens take anywhere from 15 to 30 days to reach the right size for harvesting. Once they are at that level, you can grab what you need for each meal and leave the rest to grow longer. If you want to keep a continuous supply of microgreens on hand, grow several trays on a staggered schedule.
Once you get started growing microgreens indoors, you will definitely want to try all the different options. Then, before you know it, you’ll have a list of favorites, letting you move on to figuring out ways to incorporate them into every meal.

Hello, I'm Susan Thibeault and I'd love to assist you. Whether you're in the research phase at the beginning of your real estate search or you know exactly what you're looking for, you'll benefit from having a real estate professional by your side. Real estate has been my passion since graduating from college. In addition to real estate sales, I worked for a real estate attorney several years- an invaluable experience added to my overall knowledge of the real estate process. I have been a gold level top producer broker consistently since 2003, making Remax's hall of fame in 2015. I'd be honored to put my real estate experience to work for you.